Another Couch Recovery
I have been lax in my posting this last week mainly due to the fact that we're "back-to-school." I homeschool and this year we have a pretty full schedule. I know--excuses, excuses.
Since I added a full-time school load, I thought I'd also recover my faded couch. That makes sense, doesn't it? Actually, my son was working nearby and I looked at the couch and I was ashamed. It was already faded. Now there were two holes developing. It was just time.
Here it is "before":
The fabric was a freebie I acquired last summer. It's very heavy-duty. Here, I've recovered the back and have begun on the bottom front:
Remember, this is not a professional re-upholstery job. This is a "no-sew" slipcover using the staple gun, safety pins, hot glue, and lots of tucking. Here you see the bottom front being secured to the seat with safety pins:

I tipped the couch over to show how I just tucked and stapled underneath. It is NOT a pretty sight. Good thing that the only way others will see it is if they're crawling around on my floor. If they're doing that, well, they deserve to see this!:

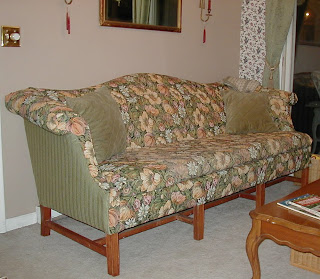
I had only five yards of the flowered material. I picked up some soft green fabric (about 3 yards) for $1.00 and used it on the sides where it wouldn't matter that it isn't sturdy. This material will also go on the back, but I have to piece it together. I haven't done that yet. The couch sits against the wall. I'll get to it sometime...I promise!

The fronts of the arms are the most annoying part. Here I show how I've trimmed and stapled the edges onto the front. I attempted to make a template (with paper) and cut a piece to glue to the front. The attempt was not a great success, but these raggedy edges are at least covered. (You'll see the picture of the fronts in the finished pic.)

The completed (except for the back) project. So, as long as no one crawls on my floor and looks underneath, moves the couch forward to look at the back, or peers too closely at the fronts of the arms, I think this will pass!
Now, it's time for school...
(For step-by-step instructions on sew-free re-upholstery, click HERE.)


5 comments:
I actually like the green in the back. I think you should leave it. It gives it character. But after all it is your couch not mine. I think the two tone looks really good though. You did a really good job!
I'm liking the two-toned effect, too.
It seems more "tailored" or something. No one will know it's because I ran out of material LOL!
Wow, you are ambitious! Looks great! I like the two colors, also.
I love your "new" sofa! The combination of the green and floral looks so beautiful.
Trixie
Packrat--Hardly ambitious. This couch needed recovering a YEAR ago LOL! Since I noticed the TWO holes developing, I knew that I'd better do something about it.
Trixie--Thanks! Now that I've finally got this material on, we're going to settle on a color for the kitchen/dining/living room areas that have also been needing an uplift for at least a year (or more) and paint it THIS Saturday (as far as I know). I'll post pics when it's finished.
Post a Comment